Showing posts with label halloween. Show all posts

Monday, October 30, 2023

Let's Draw! Candy Corn...that's also a Vampire!

Let's Draw! A...Vampire Candy Corn because...why not? 

Let me show you how in less than two minutes:


See? Wasn't that super easy and fun?! 

Want to draw more Kooky Candy Corns? Well, just tap the link for a download to this drawing sheet and enjoy!
Read more »

Friday, October 13, 2023

DIY: Pumpkin Planter!

Hey, y'all! Last week I shared that I created this Skull Planter. While at the same time I was makin' that mess, I also created this cutie! I finally got around to painting it and thought I'd share the process with you.

If you are looking for the supplies I used, mainly, Celluclay, you can find it here

Okay, now for the process!


Now I don't plan on keeping him out all year like my skull planter so...I did just drop a plant inside that was already in a smaller planter. That way, when the season is sadly over, I can just take it out. However...I love his happy face so much that I may keep him out past Halloween!
In case you would like to see more things I've crafted from Celluclay (and maybe a little inspo for spooky crafts), check out this blog post! 
Everything about this season makes me so happy. Including this guy!
Thanks for letting me share!
photo signature_zpsd10b3273.png
Read more »

Wednesday, October 4, 2023

DIY: Skull Planter!

I spotted the coolest planter ever the other night at Cracker Barrel: it was a large plastic skull planter and I just had to have it!

Until I saw the $40 price tag.

Then I remembered how a while back I made TONS of Halloween decor with one of my long forgotten favorite art supplies: CELLUCLAY. You can check out all of those creations (well, most of them anyway), here. 

Here's the how-to video!

The process is super easy! All you need is Celluclay and a plastic planter...and acrylic paint. That's it! Oh...and maybe a cute little plant. This is one I scored at Walmart years ago on sale. It was so sad and almost dead that I named it Peanut. Peanut is now living it's best life in my brand new skull planter!
Part of the magic is in the painting when it comes to this kind of thing. I used a base coat of gray and then added a darker gray to the eye sockets and the nostrils to really deepen the look. Then I used diluted off white paint to go over that in the light areas. Finally I used a dry brush and white paint to add the highlights. 
I won't be leaving this outside. Celluclay, since it's waterbased, would probably not fair well outdoors. 

So in my over-crowded plant window, she will go!
Thanks for letting me share! I actually think I need to make more of these. Why, I have no idea! But it was just so fun and Halloween season is my absolute favorite!

photo signature_zpsd10b3273.png
Read more »

Tuesday, October 3, 2023

Easy Pumpkin Sculptures!

Hey, y'all! 

I'm all about the Halloween projects lately and I came up with one that I know your students will love! I mean...I loved making it so even if you just need a fun little weekend craft to unwind, you may want to try this one on for size. 

You can find the supplies for this right here. But really...it's just foil sheets, plaster wrap and acrylic paint. Sticks, felt and pipe cleaners are things the average art teacher has in surplus so...you can add that to your shopping list if necessary. But if you are anything like me, those types of supplies seem to multiply in your supply closet!

I created a kid-friendly video for you to share with your students if you'd like. You can find it here:


Personally, I know my students would struggle with the face. So! I talk about embracing your mistakes a lot in the video. I also chat about practicing first. I would recommend doing the faces with a paint pen if you have younger students. I know paint pens like Posca markers are expensive...so maybe it's a station students can rotate to when finished.
But who's to say they have to add a face? They could designs like dots with a sponge brush. Or they could collage a face onto the pumpkin. That might be easier for them. OR you could bust out those googly eyes that also multiply in your closet. I mean, really, the possibilites are endless. Just start with a cute pumpkin base!
If you need a little time between pumpkins drying, you might want to check out this post. Students could work on this pumpkin drawing activity in addition!
Full video right here!
Most of all, have fun! And if you create these cuties, please be sure and tag me on social media. I love to see what you and your students create!


photo signature_zpsd10b3273.png
Read more »

Monday, September 18, 2023

DIY: Embroidered Eyeball Earrings!

We were traveling to Halloween Horror Nights in Orlando this weekend (our very favorite thing ever) and I decided to take an airplane craft with me. I love to take little embroidery projects with me because they are lightweight and easy to transport. Earrings are my favorite things to embroider: they are quick and easy to make and super lightweight to wear. I've made several now and I've shared the process on each in this blog post!

I broke down the steps so you can make your own!

Now if these eyeball earrings of mine are giving you a little deja vu...that might be because I recently shared an eyeball necklace DIY!

If you wanna go bigger with your eyeball theme, then I have a video on how to create these eyeball ornaments right here!
I even made an eyeball dress! It's one of my favorites. You can check it out here. 
I am in love with these! I now feel like I need a whole set of Halloween embroidered earrings. I'm thinking skulls, pumpkins, ghosts...you name it!  

I also think that if you need a simple intro to embroidery project, this might be it! You can also check out all of my fibers projects here! 

Please do lemme know if you make some eyeball earrings so we can be twinsies! Have fun!

photo signature_zpsd10b3273.png


Read more »

Monday, September 11, 2023

DIY: Let's Sew a Dress from a Shower Curtain IN ONE DAY!

Recently, I was out poking around at Ross (for those unfamiliar, this is a discount everything store) and I stumbled upon the cutest shower curtain. It had a big and bold print on the fabric (which I love and is super hard to find) and it was Halloweenie! I'm a big fan of Halloween and I've already stitched up two dresses for the season (one I've not even shared here yet!). So I scooped up this shower curtain for a mere $8.99 and gave myself a challenge:

SEW A DRESS IN ONE DAY!

Let's see how it went:


Y'all! I love it! 

I was super surprised that the metallic print on the fabric was so resilient. It didn't chip off when I stitched it which was my big fear. The fabric is super light and flowy, making it perfect for a circle skirt. AND I was surprised to find that when I ironed the fabric, it didn't harm the print! 
I am wearing a crinoline under the dress to help with the poof. I'm a sucker for a poofy skirt. 
I'm returning to Halloween Horror Nights this week...which is in Orlando. Knowing it will be hot, I'm excited that the dress is so lightweight. I can't wait to wear it!
I paired it with this black belt but I'm thinking I may prefer the black bow. What do you think?

I paired it with this necklace I found at TJMaxx (clearly, I'm a shopper) and some fun earrings and hairclips that I've had for years.

So I'm happy to say...I can sew a dress in a day! From a shower curtain of all things!

AND I just remembered...this isn't my first time using a shower curtain for clothing! Check out this number!


photo signature_zpsd10b3273.png
Read more »

Wednesday, September 6, 2023

DIY: An Eyeball Necklace for Halloween!

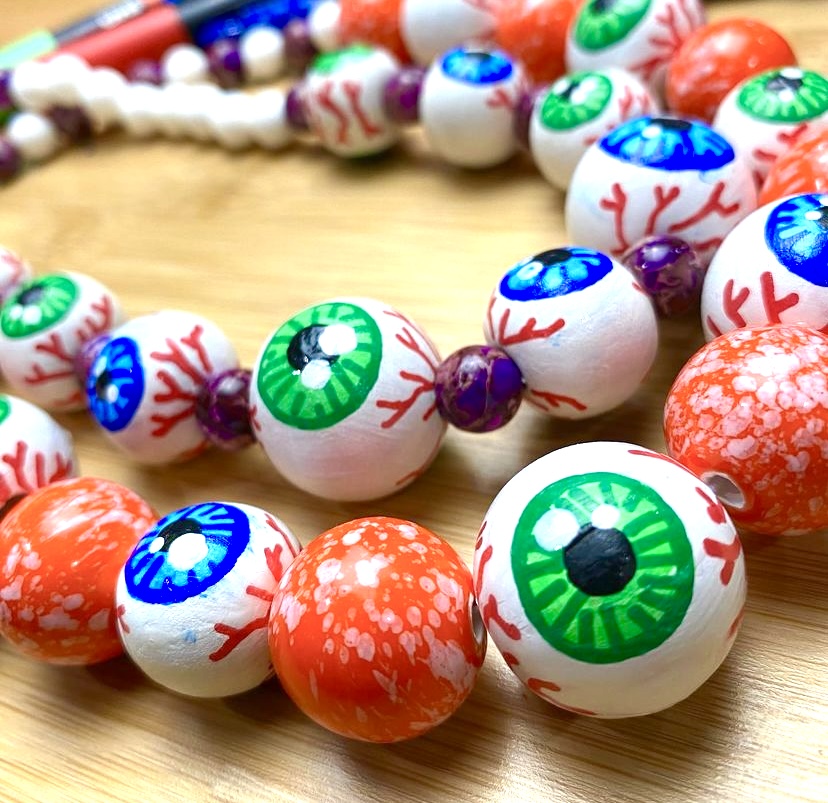
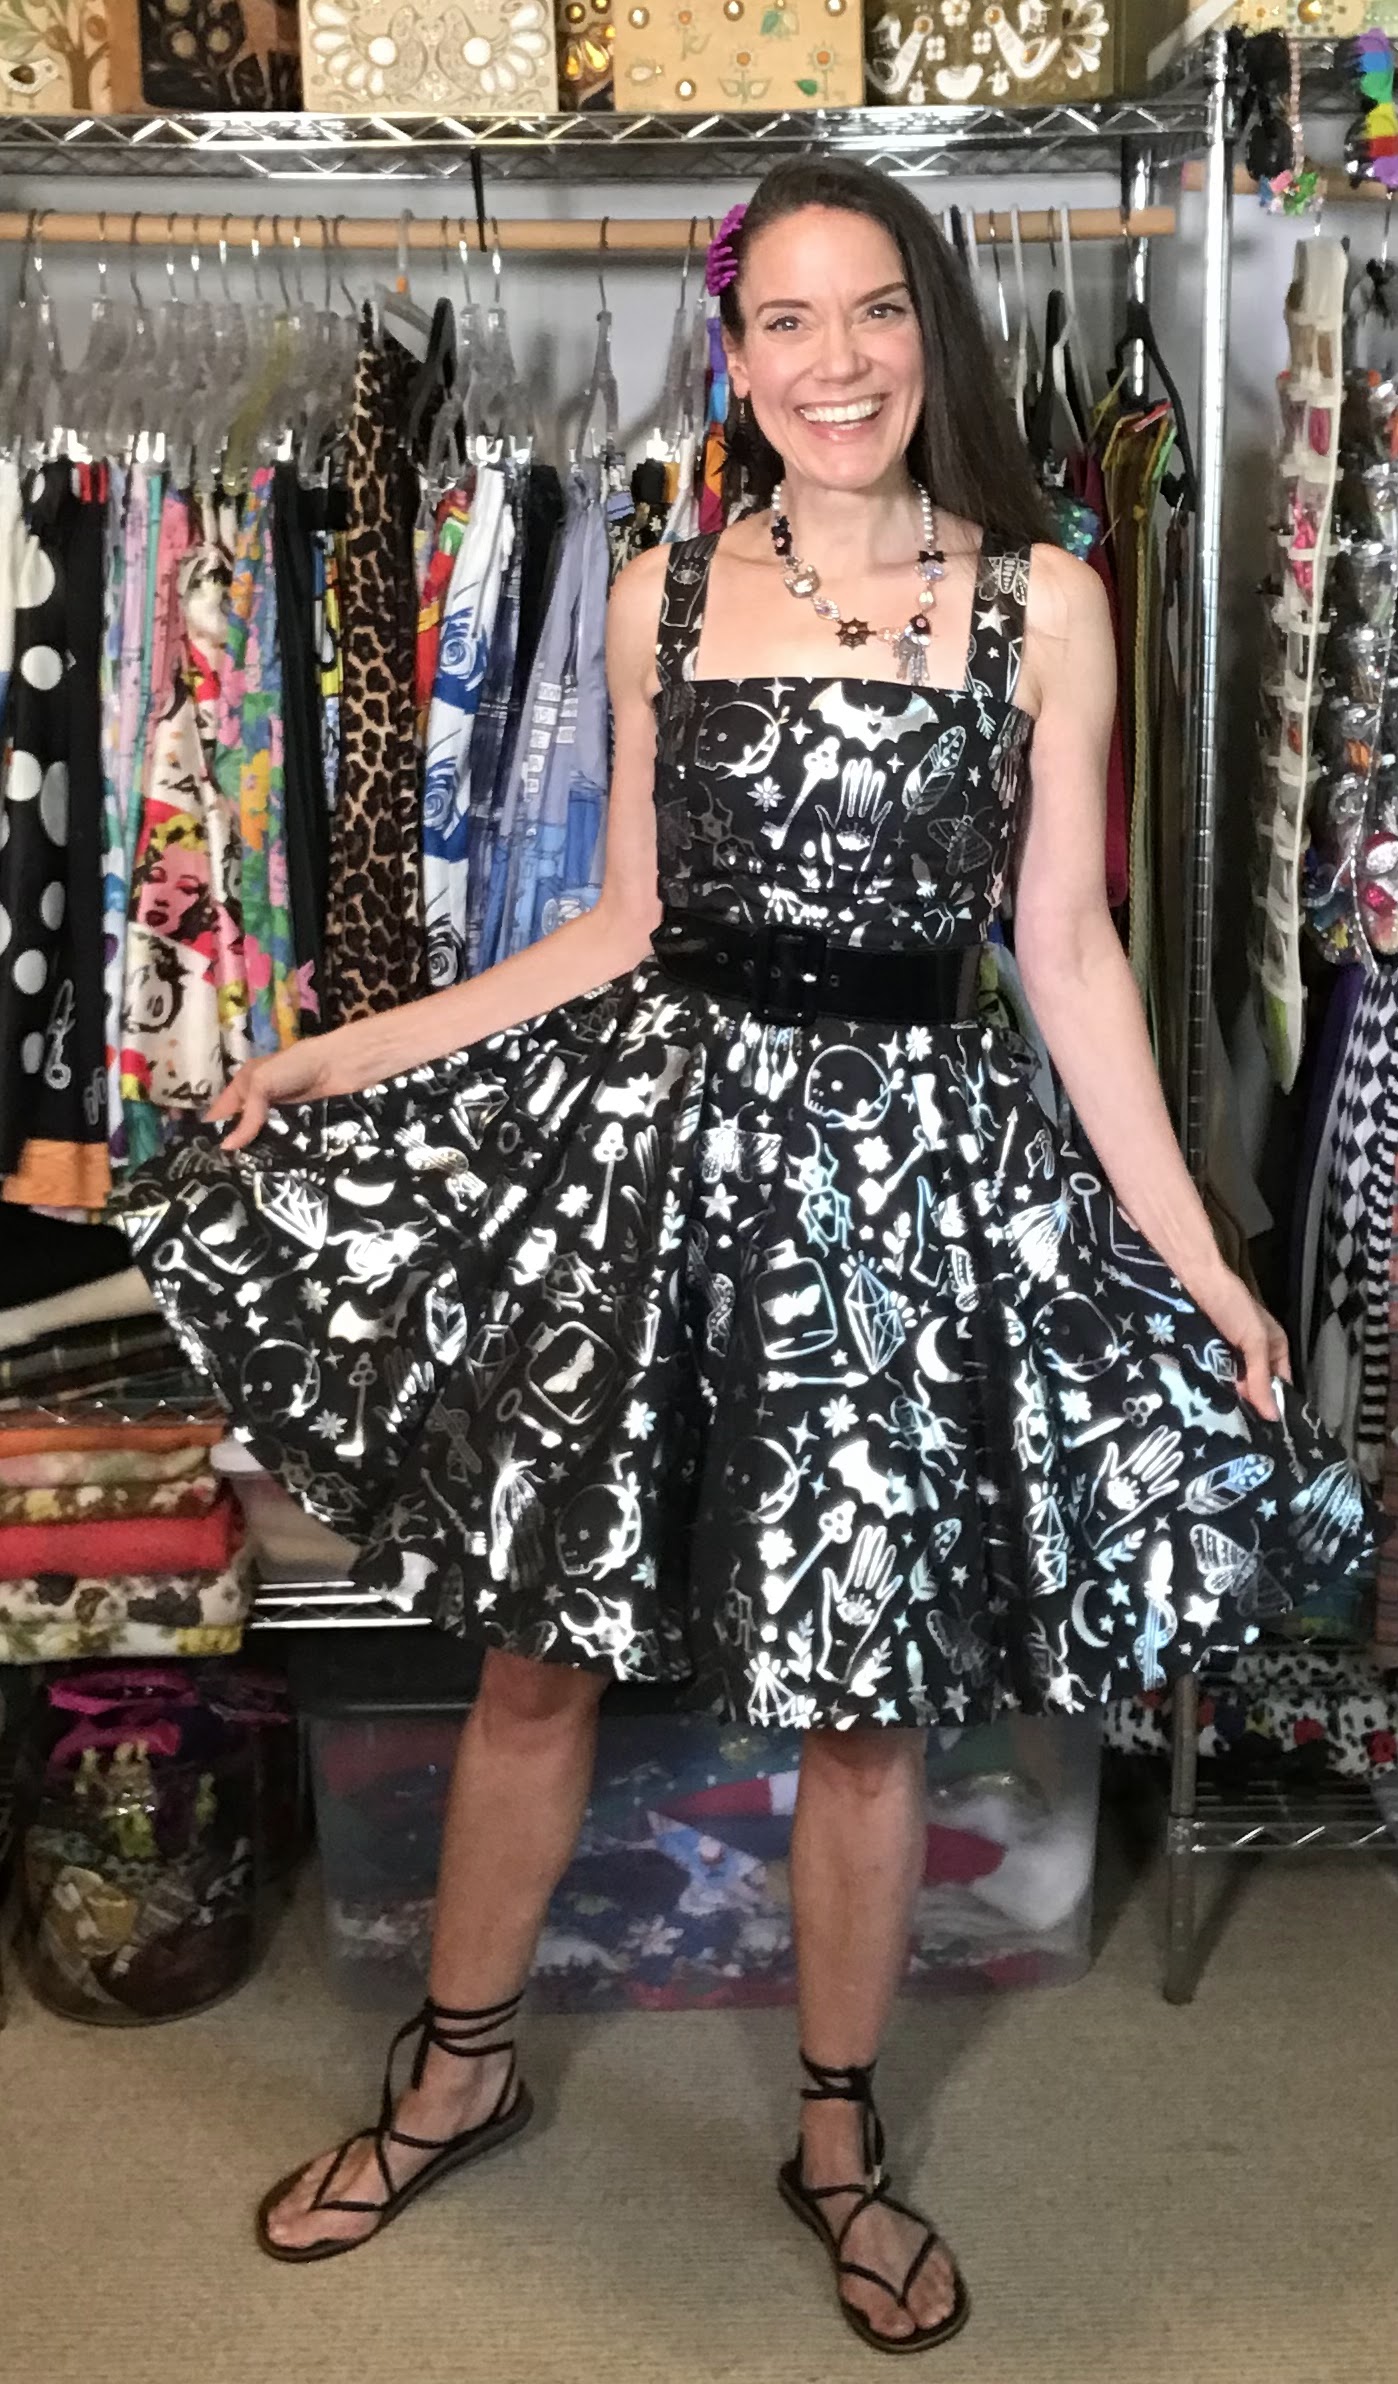
I just finished making my third Halloween craft of the season! I shared my new Halloween dress in this blog, complete with a video tutorial, here. Then I made another dress...which you can see a sneak peek of in this photo. I can't wait to share it with you but until then...let's make an eyeball necklace! Here's what you'll need:

* Large wooden beads
* White and black acrylic paint
* Skewers
* High gloss Mod-Podge
* An assortment of beads
* Elastic string
* Paint markers
* Flat paintbrush

And here's a little how-to:

My only real tips: 

* Work on these in batches. This will allow dry time between the white paint, the iris, the pupils, the highlights and the red veins. Thankfully, the paint markers dry quickly!

* Lay out your design on a plate. This will keep the beads from rolling all over the place.

* Don't worry about 'mess-ups'. In the end, no one will notice a wonky circle or a misplaced bloody vein. Trust me! 

* Have fun! Do this as a craft while watching your favorite horror flick or listening to a spooky podcast to get you in the mood!
Making these necklaces on elastic means I can easily put them together! And slide 'em over my big ole head.
I already debuted my necklace with my new dress at Halloween Horror Nights at Universal Studios! It was fun to dress all creepy for the occasion. 
You'll have to know if you decide to give these a try! And stay tuned...I have so many Halloweenie crafts coming your way. 
Until then...I have my eye on you!
photo signature_zpsd10b3273.png
Read more »

Wednesday, November 7, 2018

Greg Mike LOUD MOUTH-Inspired Lesson

Hey, friends! I feel like it's been forever since I chatted with y'all...we currently have no internet at my house (long boring story that we hope to remedy soon!) which means I've not been able to share with you. So I'm staying late this afternoon to post a recent lesson I created for my students (this is actually a sub video! My sub and the kids LOVED it!). 

I was inspired by a lesson that Mr. DeWilde shared on his blog. In fact, you can purchase his lesson plan (which is different than mine and, honestly, probably better!) over on his page. DO IT. I saw his kid's projects on Instagram and immediately knew my kids would love doing it! So here's my version...feel free to use in your art teacherin' world:
My sub and the kids did a great job with this! They created their sketches first and then started creating. Most did not finish...which means that next week, they will be wrapping up their big mouth's with me before heading off on Thanksgiving Break!
Leaving videos for my sub that s/he is able to use with ALL grades is one of my most favorite things ever. It means one lesson for them to remember, one set of art supplies, one easy day! I have a TON of sub lessons on my blog and my YouTube channel...you are more than welcome to use in your art teacherin' world. Have a great week, y'all!
 photo signature_zpsd10b3273.png
Read more »

Tuesday, September 25, 2018

DIY: Top Favorite Fall Crafts

Fall is my very favorite. Halloween is my very favorite. If you've been around this blog for a couple of sessions then you know that it's this time of year that I'm usually firing up the hot glue gun, busting out the Celluclay and creating things that go bump in the night. This year...well, I'm just a little busy with other things to craft any spooky goodness. However, I do believe I'm pretty well stocked in all things frightening. So I thought I'd put them all together in one big ole blog post! All links will take you back to the original post which, more than likely, will have a how-to video. Happy Crafting!
1. Probably one of my all time favorite fall creations were these Zombie Head Planters. This was at the height of Walking Dead/Zombie popularity (remember when EVERY movie was a zombie movie?! Not that I'm complaining but, really, how many zombies movies do we need?!). I loved creating the expressions for these dead dudes!
2. These Halloween miniature pieces were fun to craft on an afternoon. The pumpkin dude was created from paper clay found at the craft store. And the little painting was a copy of a vintage Halloween creation. 
3. UGH, THIS PHOTO MAKES ME LOVE HALLOWEEN SO MUCH! I created these creepy heads with Styrofoam head forms found at Joann's, cheesecloth and liquid starch. That creepy mummy just might be my favorite.
4. The things you can do with that liquid starch and cheesecloth combo, y'all! This was a vintage music box thingie that I transformed into Frank and his Bride. Can I get a gig where I just sit around and make Halloween stuff 24/7? BECAUSE THAT WOULD BE AMAZING! 
5. When I found this old jewelry box at the thrift store, I KNEW I had to make it into a book of spells. Weird? Probably! But I'm telling you, Celluclay is magical and you can make just about anything with it!
6. On that same thrifting trip, I found a bunch of bottles and decided to craft potion bottles from them!
7. I've got my eye on you. All of 'em! How-to video included in this creep-tastic EYE POPPING blog post...sorry, I had to. 
8. What I really love most about creating is taking something boring and transforming it into something insane. This was a little "Country Store" bird house type thing...that I completely spook-i-fied. I love the little light at the top! Details here. 
9. Wow, you're such a chatterbox! Did I mention that I love creating with Celluclay? Okay, lemme tell you what it is: it's basically a paper pulp type of clay. It comes in dry form and all you do is add water. I love to add it to an armature, whether it be one I made or one I've thrifted. Once the creation is dry, I usually paint them all black and dry brush the color on top...I love the antiqued look it gives. Details on these guys can be found here. 
10. Yes, in case you are wondering, that IS a candy corn tree. More deets on that in a second. First, can we talk about that eye-popping dude? Loved creating those creepy skulls!
11. Gangster Bats! Beware...they'll give you an offer you can't refuse. 
12. The Halloween creation that started it all...these guys! I made them back in 2015 and they are still my most favorite thing! LOOK at those faces, so silly and happy. Details here.
13. The Bride has ALWAYS been my favorite...mostly because I find the actress, Elsa Lancaster, so striking! This was so much fun to paint...I need to paint more, I miss it. Mixing all those different tones tho? NOT my favorite!
14. Is it even fall without Day of the Dead creations?! I think not...they speak to my love of color on these cloudy days filled with crunchy brown leaves. These planters were so fun to paint!
15. We travel a lot during the fall...mostly to our haunted house events. I love to have a craft on hand to work on and embroidery is usually my go-to. This reversible necklace was created during one of our Halloween adventures.
16. Hosting craft nights is one of my favorite things...something I don't make the time to do right now...but hope to in the near future! My artsy friends and I created these guys on a craft night a couple years ago and they are still my favorite. 
17. Decorating a candy corn tree counts as a fall craft, right?! This tree is from Treetopia and it's just about the best thing ever. I have a rainbow version in my art room!
18. I've never officially blogged about my Hitchhiking Ghosts painting inspired by Disney's The Haunted Mansion because I felt like I never finished it! But I kinda don't mind it in it's ghastly ghostly state...and I'm pretty sure I'm just too lazy to finish it.

And there you have it! My Top 18 Fave Fall Crafts! I'll be continuing this lil series with my fave fall art projects for kids and, of course, my fave fall ensembles. Yay! It's fall, y'all! 
 photo signature_zpsd10b3273.png
Read more »