I'm all about the Halloween projects lately and I came up with one that I know your students will love! I mean...I loved making it so even if you just need a fun little weekend craft to unwind, you may want to try this one on for size.
You can find the supplies for this right here. But really...it's just foil sheets, plaster wrap and acrylic paint. Sticks, felt and pipe cleaners are things the average art teacher has in surplus so...you can add that to your shopping list if necessary. But if you are anything like me, those types of supplies seem to multiply in your supply closet!
I created a kid-friendly video for you to share with your students if you'd like. You can find it here:
Personally, I know my students would struggle with the face. So! I talk about embracing your mistakes a lot in the video. I also chat about practicing first. I would recommend doing the faces with a paint pen if you have younger students. I know paint pens like Posca markers are expensive...so maybe it's a station students can rotate to when finished.
But who's to say they have to add a face? They could designs like dots with a sponge brush. Or they could collage a face onto the pumpkin. That might be easier for them. OR you could bust out those googly eyes that also multiply in your closet. I mean, really, the possibilites are endless. Just start with a cute pumpkin base!
If you need a little time between pumpkins drying, you might want to check out this post. Students could work on this pumpkin drawing activity in addition!
Recently I shared that my students were doing Shape Stations (or centers) in the art room. I did this after the success of both our Dot Day and Line Study stations. I'm loving the exploration the kids are able to do and the kids are loving it...for the same reasons. Not to mention, it's just FUN to try a whole bunch of new ways to create in just a few art classes. Here's a look at our Shape Stations:
And what we did during our Line Study:
And some behind-the-scenes tips on these stations:
Here is a look at the Dot Day stations that started it all:
And since we did two days worth of fun:
Once we finished creating artwork from our line study (lessons which I've yet to share here!), I ventured into shape. Currently, I'm doing shape stations with 2-4th only as kindergarten and first are in the middle of other projects. I do think that these shape stations would work for k-1st except maybe the radial symmetry design. But it's always worth throwing the idea out there to see what the kids come up with, right?
Here's a little look at what the back table in my art room looked like after I began prepping for our shape study. Initially we were going to do some shape stamps (seen in the upper left hand corner) but after giving that a run through with one class, I decided it was too similar to the sponge stamping. We switched to the bleeding tissue paper shapes in the end.
Now when I'm working through these station ideas, I also gotta start thinking: what are we gonna do with all of these papers and things we create? Here's a little look at what I've come up with...
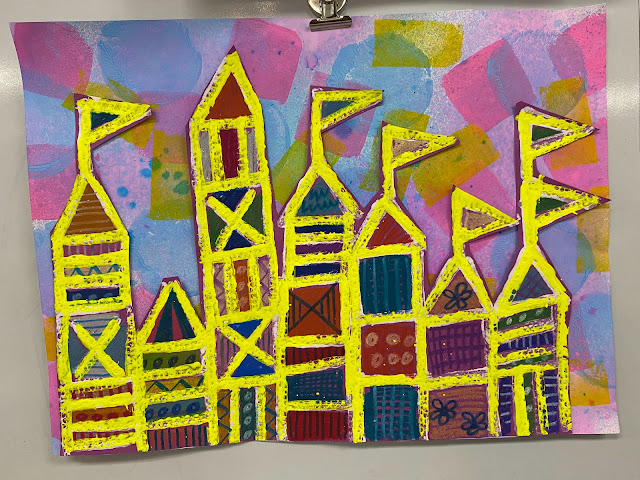
First grade is currently working on the self portrait in the upper left hand corner. This is a lesson I've done many times, you can check out the lesson here. As for 2-4th, well...I am currently having them all work on those castles! We will all do printing with our stars...and do some embossing too...but as of right now, we are all learning about Mary Blair. Here's the video I created.
The kids are enjoying working with chalk and oil pastel. I'm excited to give them another opportunity to really explore a variety of supplies.
Above is my example and below is a class of I think thrid graders examples. I will say this...stations means the kids will often work quickly and not always at a slow and 'careful' pace. I'm fine with that. However, I did have a small handful of students later decide the wanted to redo theirs, knowing it was not their best work. I allowed that too.
So far, we've gotten the castles chalked in and now we are ready for the oil pastel.
Our backgrounds will be our bleeding tissue paper. Since winter is coming, we are turning it into a winter wonderland with snow...and a little bit of sparkle on the frame. Oh...and PUFFY PAINT. Everyone's favorite!
Here's an easy and fun way to teach about the four parts of a landscape: horizon line, back-, middle- and foreground. What I love about this little lesson is that the pop-up stands up and it can act as a card of a storytelling prompt as it opens like a book! Check out this three-minute demo. Feel free to share with the young artists in your life!
Hey, y'all! I started a new lesson with my first graders this week. They are really enjoying it and I thought your students might as well. So I quickly created a lesson video for you, if you are interested. In my art class, we learned more about the artist Heather Galler and looked at her work, her love of pattern, color and bold line designs. Afterward, we spent our first thirty-minute art class sketching together in our sketchbooks in preparation for the following day's painting. The next day, we sat on the floor (see last photo) and, using an ink-filled bingo dauber, we drew these masterpieces together. No pencils first, we just dove right in. My students were excited by the results and I can't wait to see how they go about adding color with oil pastels and watercolor paint. Here is a quick lesson video I created for you and your students if you are interested!
And here's me hanging out with a class of first grade masterpieces. I didn't intend to match their work but when one of them pointed it out to me, I had to laugh. I do love me some black and white!
If you decide to do a workshop like this in your school or educational setting, please know that this was created by me and I would greatly appreciate acknowledgement. I'd also love to hear from you! My email address is cassieart75@gmail.com. Yesterday I released three new podcast episodes that I hope you'll take a listen to and enjoy. In this blog post, I want to focus on one of those episodes, Ep. 8: Discovering Your WHY. Before you listen to this podcast, I want you to know...it's what I'm gonna call a "working podcast". What I mean by that is I want you to carve a mere 20 minutes out of your day, grab some paper and markers, flair pens, crayons, whatever and sit down with me. And think. And dig a little deep. And create. Here's a little more info:
What we're going to cover are three questions. I'll walk you thru them a little bit here...but listening to the podcast is really going to take in all of what I have to share. Each of these questions only requires four responses. I would encourage you to unplug, settle back, and answer from your heart. Not how you think I want you to respond, now how you think your favorite teacher on IG would answer but YOU.
Me lookin' like a crazy person while presenting. I'm just a lil passionate, that's all.
I did this workshop recently in a two and a half hour session at Get Your Teach On. We spent a lot of time thinking and creating and walked out of that workshop with a strong sense of WHY we teach. Discovering this is empowering for you. It will give you a sense of purpose on those days when you need it the most. Not to mention sharing your WHY with your students allows them to know the importance you place on spending your days with them. They will learn their value in your classroom.
I'm going to be sharing a portion of my workshop in this blog post. I won't be sharing my responses to the questions with you here but you can hear them in my podcast. FINAL THOUGHT: I would love (and share!) to see your responses and creations! Feel free to email me or, if you post to Instagram, tag me in your stories or posts. In doing so, I'll assume you are okay with me sharing your creations here or on my Instagram. Okay! Let's get started!
You can answer this question any way you like, whether that be literally or figuratively. All I want are four little words. Don't over think this. Your knee-jerk answer is what we're lookin' for.
Again, same thing. There is no right or wrong answer, just YOUR answer. What YOU want your students to spend time with you doing. What's important to YOU as their teacher.
You got it? You got your four responses to the three questions? Great. Now let's prioritize those lists with some colorful pie charts. This is where all of those random art supplies you gathered up are going to come in handy. Look at your responses to the question of what do you want your students to LEARN. My kids have 30 minute art classes. It's impossible to pack in everything that I wish. So discovering my Top Four and prioritizing them really helped me. I'm hoping it will do the same for you. Here are the pie charts I created.
You'll notice that sometimes I answered my questions literally and, other times, figuratively. I also decided to make mine colorful because I wanted to make them attractive enough to hang in my art room.
Developing these pie charts really got my wheels turning about my WHY.
And I hope it does the same for you.
I'm going to end the blog post here and hope that you'll take a listen to the podcast. I feel that I have so much more to say on this topic...so I'm going to say that this one "will be continued...". Until then, I'd love to share with you a my WHY along with that of many other teachers. You can take a look and, hopefully be inspired, right here.
When I posted this photo on my Instagram a while back it got a whole lot of love. I promised I'd share this lesson with you all and here I am! My fourth graders are ALMOST done with these, hoping to do the last step within the next couple of art classes. I'll be sure to share the end results. Until then, I've created a lesson video for you and your kids! I'll walk you thru the lesson break down and supplies in this blog post.
I hope you and your students enjoy!
Supplies:
* Watercolor paint. In the video, and in my room, the kids used Pelikan brand watercolor paint. I'll be sharing more about watercolor in a blog post tomorrow so stay tuned if you have quesions.
* Cardboard pizza rounds. I get mine from a restaurant supply place called GFS or Gordon Food Service. Amazon used to sell them. I usually can get 100 for under $20.
* Paper. I always order 80-90 lbs paper and we use that for EVERYTHING.
* Glitter (ugh!) or fake snow. I found some super cheap after Christmas!
Day 1: I see my fourth graders for an hour. On the first day, we were able to create our practice sketches and paint our final circles.
Day 2: What I didn't show in the video was how we added a little sparkle to our circles. At the start of art, the big circles were passed back. The kids "painted" them with ModPodge mixed with glitter. Once those were done, we chatted on the floor about how to paint these papers for their cities.
Day 3: Cities! We really talked about how to make a building look 3-D and the kids rocked it. Many of them drew in pencil first...but that was just suggested, not required.
Up next...cut these out, add or our cities and start on our snow! I'm excited, I cannot wait to see these complete! I'll be sure to pop back by and share more as we finish.
Need a fun lesson for your first graders tomorrow? I think I might have something for you: these adorable penguins! This lesson teaches so stinkin' much: warm colors, brush control, using watercolors, painting spirals, a review of lines and shapes and much more. The kids loved creating these.
I made a video just for you to share with your students to walk them through this lesson. Here I'll break it down for you day by day.
If this image looks familiar, that's because my kindergarten did a slightly similar lesson. You can check that out here. I see both my kindergarten and my first graders for 30 minutes twice a week. So here's how we spent Day 1 and 2: Painting spirals! Midway through day 2, most kids were finished painting their 12" X 18" papers with spirals. Once complete, the kids placed their work on the drying rack and worked on the following...
With my shorter art classes, we don't have sketchbooks. Instead, we sketch on dry erase boards. This cuts down on paper waste...and, added bonus, kids LOVE drawing on dry erase boards. I got mine at the Dollar Tree. I created a step by step penguin so my students could practice independently while their classmates finished their paintings. This is something new I've been doing this year and I love it. Not a moment of instructional/practice/work time wasted...and no wasted paper either!
Day 3: guided penguin drawing. These guys are huge, measuring in at 12" X 18". We used bingo daubers and drew on the floor. Yes, crazy...but it is the method that I found works best for me and my students. I had each place a messy mat under their penguin so we wouldn't get ink on the floor. Of course we did! It mopped up.
Day 4: The following art class, we added the chalk to create form and painted. Some classes moved quickly enough that we were also able to cut them out!
If you are looking for a fun winter collaborative project, that could be it! Skip the background painting and just create these. Add them to a backdrop and, ta da! Instant winter mural!
We hung these up with the kindergarten snowman for a fun and frosty display. Have fun, y'all!
Hey, sweet friends! I hope your week was a wonderful one...mine started out so super amazing as I had a visitor all the way from Australia! Thank you so much, Belinda for hanging out with me and my students. They LOVED having you as much as I did! Nearly all of my students were painting this week, from kindergarten through third grade. This was great because it meant low prep for me (aside from the initial painting prep which, as you know, is time consuming!). I love painting and I love teaching painting with my students. In fact, you can find out all about our supplies, set up and routines here! And, in case you are wondering, yes, my kids did draw all over this dress! Actually, they drew self portraits in the frames that was printed on this fabric and then I stitched it into a dress. You can find out more here.
My third graders spent two art classes painting these large Chinet plates for their circle loom weaving project. On the first day, we reviewed painting routines and created concentric circles. On the second day, we painted patterns on our plates. These make me so stinkin' happy! I cannot wait to weave with these guys tomorrow!
My latest new favorite thing: lidded ice cube trays. I found mine on the Walmart website but they are available in lots of places. The reason I love them: they gonna keep my paints from drying out. I've tried egg cartons and regular ice cube trays...but the paint always dries. Hoping these prove to be the solution.
Since we are all painting, I thought wearing this dress would be the safest bet! Loved chatting with the kids about how I created it. Details here.
My third graders are killlin' it with these plates and I'm so excited! I talk a lot about craftmanship in my art room...and you can read about that here.
Kindergarten hopping on the Kandinsky train with these smaller cardboard circles they are painting for Dot Day. We totally didn't make the Dot Day deadline...and that's okay with me. These are so sweet!
So I'm doing something crazy: I'm doing two different weaving lessons with my third graders! While one group is circle loom weaving, another is tree weaving. Before we could paint a landscape on our plates, we had to create two landscape painting sketches. These turned out so stinkin' pretty! Proper blog post on these to come...they will def be framed and featured in the halls soon!
My first graders completed their HUGE 14" dots this week! I adapted a lesson that I shared here. On the reverse, we'll be doing something different than the blog post...I'll keep you posted. We will be hanging these like mobiles and I'm so stoked to see them up!
After creating their two small painting sketches, my third graders had to pick their favorite to paint on their plate. I'll keep you posted on how their tree weaving goes!
Did y'all celebrate Dot Day? We did...we just didn't get everything up in time. Or AT ALL...and that's okay. I'm excited to see everything complete and on display.
I cannot wait to share with you my sweet second grader's embroidery lesson. Stay tuned!

.jpg)